Opening a directory in TextMate from Finder
I love TextMate. I love being able to load in a directory as a project, like I do with a lot of my rails applications. When I'm using Finder to navigate my filesystem, I sometimes want to open a directory into TextMate from Finder, and a contextual menu would be perfect.
Using some knowledge of Automator, this can be done quite easily.
Automator Steps
The first thing to do, launch Automator. Automator allows you to create quick scripts by giving you a building-block approach for common things you might like to do. To accomplish our task, we need two of these building blocks.
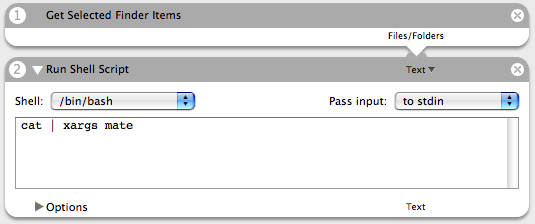
Step 1: Get Selected Finder Items.
The first thing that we need to do is get our selected Finder item, our directory that we want to open. You can find this block by typing "Get Selected Finder Items" in the search bar or by searching the Library for Applications > Finder. Now drag this bar into the workflow area. That's all we need for step 1.
Step 2: Open the selected item in TextMate.
This step is going to require something more than just dragging an element over, as we are now going to mix some Automator with some bash to get the job done. Find the "Run Shell Script" action in Library under Application > Automator.
When you do this, you will see that the textarea already has a command for us: cat. We want to add something to that command so that it reads cat | xargs mate.
NOTE: TextMate comes with a command line tool, called mate. You will need to make sure that mate is setup to work in terminal.
Saving the Workflow as a Contextual Menu
If you chose to run this script on a selected directory it should work. Now we need to save this workflow. Go to the menu bar and select File > Save As Plug-in....
Now create a nicely defined name for this script, like "Open in TextMate" and make sure that the plug-in is Finder. Hit the Save button.
In Finder, find a directory that you would like to open in TextMate. Right click this directory. In the menu that appears, you should see an Automator menu, and inside of that, you will find the script that you created. Just click that contextual menu and you will now have a shortcut to opening projects in TextMate.
Finally, you can download the workflow and save it for yourself.
Comments
comments powered by Disqus